I just came across 3D painting and it is a beautiful art that few people master with.Really what an illusion they bring , just simply superb!!! I collected dozen of photos never before seen and integrated them in this article. All look amazing to me, but I liked the “World” one the best. Another thing I noticed, is that this particular artist always poses next to his creations (when finished) in a very original way!


Tuesday, June 1, 2010
3D Painting
How to install MySQL in Windows 7
This article on how to install MySQL on Windows 7 . Before we begin, I like you to determine the system type - whether your computer is 32 bit or 64 bit.You can know the system type from the "Control Panel" -> "System and Security" -> "System".
Download MySQL installer file
Be sure to choose the MySQL installer file that corresponds to your system type. For me, it was the mysql-essential-5.1.40-winx64.msi file from the MySQL.com web site. I chose the essentials file because it is sufficient for my needs. However, there is nothing stopping you from picking the bulky Windows MSI Installer if you want.
Instructions to install MySQL on Windows 7
The process of installing MySQL is not very difficult, so don't be intimidated by the large number of points; I just wanted to be thorough.
- Start MySQL installation by double-clicking the .msi file - click "Run" when prompted.Click "Next" button in the introductory window.
- In the following screen, select Custom installation which will allow you to specify the folder to which MySQL will be installed. You can go ahead with a Typical MySQL setup but this will put MySQL deep down in the "Program Files" folder.
- Click the "Change" button and enter C:\MySQL in the Folder name field. Hit "OK" when done .
- The installer will change the MySQL installation folder to the one specified by you.
- You are now ready to install MySQL on Windows 7 operating system. Click "Install".
- It would take some time for the progress bar to move ahead... be patient .
- You may also get messages along the way - simply click on "Next" to proceed.
- When the process finishes, you'll get to see the final screen. Congratulations - MySQL has been installed on your computer. You are now prompted to Configure the MySQL server and register the product. In the interest of time, I had unchecked the second box and clicked "Finish".
- MySQL instance configuration is important - you cannot use the software until you do so. Click "Next" to proceed.
- Select "Detailed Configuration".Choose "Developer Machine".
- I suggest going ahead with "Multifunctional Database" unless you know what you are doing .
- In the following screen, don't mess with the default values and click "Next".
- The same goes for the subsequent screen - click "Next".
- For the networking options configuration, put a check mark in front of "Enable Strict Mode" if it's not there .
- Yes, it's recommended to install MySQL as a Windows service and have the system include the MySQL bin directory in the Windows PATH variable.
- The password for the MySQL server instance has to be typed in twice. Remember to keep a note of it - Don't lose this MySQL password.
- The configuration wizard has received all the information it needs and is ready to create a MySQL server instance. Click "Execute" button .
- The instance should be configured without problems.
Thursday, May 20, 2010
What is Google TV?

Today at Google I/O, the company made the announcement that everyone was waiting for — Google TV. While some glitches in the demo (with the Bluetooth keyboard) prevented it from being a “wow” moment, the implications are pretty clear what Google is going for. That is, the 4 billion TV users worldwide. Or rather, advertising to the 4 billion TV users worldwide.
Google noted that while computer usage is huge with 1 billion users, and mobile is even bigger with 2 billion users, TV is the real massive medium with 4 billion users around the world. Further, Google notes that people spend 5 hours a day on average in the U.S. watching TV — and that’s more than ever before. Then the real stat came out. 70 billion dollars. that’s the annual ad spend on television in U.S. alone.
Video should be consumed on the biggest, best, and brightest screen in your house, Google says. And while they’re not the first to attempt this, Google thinks they can get it right. There are four things they’re focusing on:
- With Google TV, you’ll spend less time finding, more time watching
- We’ll also show you more ways to personalize content
- We’ll make existing TV much more interesting
- This is much more than a TV
“TV meets web. Web meets TV” is the slogan Google is going with for this new endeavor. It will work as a new box — you’ll just hook up your existing cable or satellite box to it. All the hardware will include a keyboard and a mouse — but it will work with Android phones too. And you can use multiple Android devices to control the same TV — no more fighting over the remote.
You can also use the Android devices to speak to your TV — voice search on the TV.
Google TV is built on Android (2.1 right now, but they’ll upgrade it later). It runs Google Chrome for the browser. And yes, it has Flash (10.1).
Also cool, since Google TV is Android-powered, Android apps will work on the TV. With the device, there will be two app frameworks: web apps and Android apps. A new SDK for the Google TV is coming as well. And YouTube has a new product they’re launching for Google TV: YouTube Leanback — this is an optimized way to use YouTube on a big screen.
Google TV will be open sourced in both the Android and Chrome source trees.
Google has partnered with multiple device makers to bring the product to market. There will be three Google TV devices. Sony will have TVs and Blu-ray players with Google TV built in. Logitech will have a companion box. Intel will be powering all the devices with the Atom processor.
Google has also partnered with Dish Network — there will be an enhanced Google TV experience with it. And they have a retail partnership with Best Buy.
These will all launch in Fall 2010. But the platform won’t launch for developers until 2011.
As a bonus, as Google showed during its demo, Google TV is one hell of a way to search for “MILFs” from your couch.

Friday, April 16, 2010
Tips for writing a blog
When i started blogging i knew like what to do but then just to make it clear i started surfing about tips for making a good blog and i came across many things and the below are few best points that i came across.Just have a glance if you are new to blogging and its just a "turnback to the basics"
- Long, thoughtful, provoking and inspiring articles – every now and then. You don’t want to overwhelm your blog followers with three or four blog posts a week that span several screen lengths. But once in a blue moon – go for it!
- Short thoughtful, provoking, and inspiring articles – get the difference? You don’t have to write a novel. Just a paragraph or two.
- ”How-to’s” – 3 steps, 5 secrets, 3 tips types of articles. For example, three things you need to pack for a day-long hike. Or five must-haves in your make-up kit.
- Quotes – yours or others. You can just post the quotation, or you can explain why this particular quotation is particularly inspiring to you.
- Resources – this is where you share your favorite things: books, tools, other coaches/consultants/experts.
- Quick stories about something that happened to you that highlights a perspective you believe in.
- Poems or songs about your movement that would be inspiring to your tribe
- Events you are offering/leading – yes, you can even post sales-type posts in your blog. (Which is really handy when you have your blog linked to social networks.)
- Stories about your friends – their shifts, aha’s, awarenesses, why they work with you, results, profiles. Stories show what you do, much better than you just telling what it is you do.
- Updates, feedback, buzz about events you are leading, such as “The top 3 questions I’m getting from my friends...”
- Stories, themes or trends you are seeing with your mates/colleagues.
- Free checklists - you probably have all kinds of “get started quick” type of lists – use these as special blog postings to generate credibility and expertise
- Any events where you are appearing, being interviewed, telesummits, and the like. Let people see what you’re doing!
- Photos – photos – photos! They are inspiring! Of you, your surroundings, your clients, people you are with, you and your mentors.
Simple Science -- Refraction
I wanted to make glass disappear in a liquid . I was just browsing about it and found the way.This simple video shows how the glass gets disappeared inside the liquid.
Step 1:
Get a glass rod made from pyrex. This was the hardest part. I got one from the high school chemistry department. Using hollow glass objects like test tubes and pipets and eye-droppers isn't as impressive. The double wall nature of these objects makes it more than twice as hard to make the object disappear. Plus having a glass rod results in a simple test to see if your liquid's index of refraction is too high or too low (explained below in step 4). Pyrex has a low IOR compared to other glasses. Fortunately it is a very common glass. Most glass blown decorations are also pyrex so you could try one of those if you have one.
Step 2:
Pick two liquids that can be mixed together . One with an index of refraction higher than glass and one lower.Baby Oil's IOR is slightly lower than glass. Oil is slightly higher.You only have to mix for 10-30 seconds before testing. It requires 1 to 3 minutes each time you add a drop of water. Also it gets bubbles in it easily and they take 30-60 minutes to reach the surface and pop.
Step 3:
Next is to find a suitable transparent container and put a horizontal line on it or behind it for testing purposes.
Step 4:
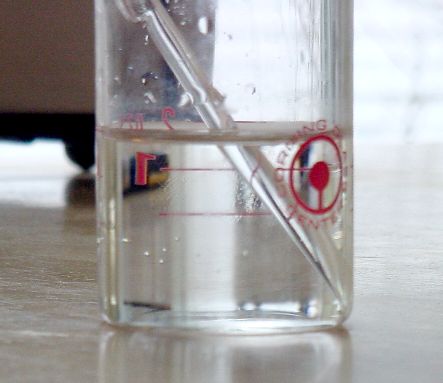
Testing! Put your liquid in your container, insert glass rod. Hold rod vertically and tilt it to the left or the right. If the horizontal line tilts in the same direction, then the index of refraction of the liquid is too low. Water is a good example of this. Here is a picture with water - note that the red line is angled roughly twice that of the rod but in the same direction. If the line tilts in the opposite direction your IOR is too high. As you get close, the tilt is very subtle and you have to look at the edges, tilt the rod more, or hold the rod farther from the horizontal line (towards the front of the container).
Step 5:
Mixing - obviously steps 4 and 5 are repeated alot to get it perfect.If you add too much water (easy to do) and your container is getting too full, put this mixture aside and use it instead of water next time. The mixing goes much faster because the difference in IOR between the two liquids isn't as dramatic.
TEMPERATURE! - I've read that temperature will affect IOR so make sure you do your testing with the liquids at room temperature or at the temperature which they will be used. This goes for your glass also.

Tuesday, April 13, 2010
Simple Science -- Magic Sand
Because magic sand resists water, it performs very strangely when it is exposed to water. Individual grains of sand tend to stick together in the water, creating blocks of sand underwater which can be molded into various shapes. When scattered lightly across the surface of water, magic sand will stick together and form a thin layer of sand which eventually get too heavy to float, sinking slowly to the bottom. Magic sand also appears slightly silvery underwater, thanks to the bubble of air which forms around the granules of sand. When lifted out of the water, magic sand is perfectly dry and free-flowing. People who grew up playing with magic sand may remember how mesmerizing the mysterious substance was, as the seemingly solid underwater shapes would dissolve instantly when pulled out of the water. The idea behind this sand when it was initially developed was that it could be scattered across an oil spill to bond to the oil. As the sand bonded with the oil and to itself, it would grow extremely heavy, eventually sinking to the bottom of the ocean and taking the oil with it. However, magic sand proved expensive to manufacture, and doubts were raised about the environmental soundness of this cleanup method.As a result of its commercial failure, the manufacturer was left wondering what to do with its new invention. The solution was to dye the sand in eye-catching colors, label it “magic sand,” “Mars sand,” or “space sand,” and sell it as a toy. Magic sand was immensely popular in the 1980s, much to the chagrin of parents who had to clean up after their children, and it continues to be used in scientific demonstrations of the properties of hydrophobic materials. You can make magic sand at home, should you feel so inclined. Magic sand can be made by baking sand to remove the moisture and then coating it with a water repellent such as 3M's Scotchgard, tossing the sand to ensure that it is evenly coated.
Magic sand is ordinary sand which has been coated with trimethylsilanol, a compound which makes the sand resistant to water. The result is a hydrophobic sand which can be used in all sorts of interesting ways. Magic sand was originally developed for use in the cleanup of oil spills, but it has come to be used as a children's toy and educational tool instead. Many stores which sell science-orientated kid's toys stock magic sand.


Sunday, February 14, 2010
Shortcut
I recently attended the Virtuoso 10 QUIZ at my college symposium after which i wondered that i was not aware of many Keyboard Shortcut keys because there were few keys whose function was asked and i was blinking as that of the participants!!So just made a brief collection of Keyboard Shortcut keys and have posted it here.It is not necessary that one has to know the Shortcut keys but then it is essential to make one's work faster if you want it to be!Else not a big deal!!
I have posted from simple key combination so even a lay man can use it,just not only Professionals( lol ).
Windows system key combinations
F1: Help
- CTRL+ESC: Open Start menu
- ALT+TAB: Switch between open programs
- ALT+F4: Quit program
- SHIFT+DELETE: Delete item permanently
- Windows Logo+L: Lock the computer (without using CTRL+ALT+DELETE)
Windows program key combinations
- CTRL+C: Copy
- CTRL+X: Cut
- CTRL+V: Paste
- CTRL+Z: Undo
- CTRL+B: Bold
- CTRL+U: Underline
- CTRL+I: Italic
Mouse click/keyboard modifier combinations for shell objects
- SHIFT+right click: Displays a shortcut menu containing alternative commands
- SHIFT+double click: Runs the alternate default command (the second item on the menu)
- ALT+double click: Displays properties
- SHIFT+DELETE: Deletes an item immediately without placing it in the Recycle Bin
General keyboard-only commands
- F1: Starts Windows Help
- F10: Activates menu bar options
- SHIFT+F10 Opens a shortcut menu for the selected item (this is the same as right-clicking an object
- CTRL+ESC: Opens the Start menu (use the ARROW keys to select an item)
- CTRL+ESC : Selects the Start button (press TAB to select the taskbar, or press SHIFT+F10 for a context menu)
- CTRL+SHIFT+ESC: Opens Windows Task Manager
- ALT+DOWN ARROW: Opens a drop-down list box
- ALT+TAB: Switch to another running program (hold down the ALT key and then press the TAB key to view the task-switching window)
- SHIFT: Press and hold down the SHIFT key while you insert a CD-ROM to bypass the automatic-run feature
- ALT+SPACE: Displays the main window's System menu (from the System menu, you can restore, move, resize, minimize, maximize, or close the window)
- ALT+- (ALT+hyphen): Displays the Multiple Document Interface (MDI) child window's System menu (from the MDI child window's System menu, you can restore, move, resize, minimize, maximize, or close the child window)
- CTRL+TAB: Switch to the next child window of a Multiple Document Interface (MDI) program
- ALT+underlined letter in menu: Opens the menu
- ALT+F4: Closes the current window
- CTRL+F4: Closes the current Multiple Document Interface (MDI) window
- ALT+F6: Switch between multiple windows in the same program (for example, when the Notepad Find dialog box is displayed, ALT+F6 switches between the Find dialog box and the main Notepad window)
Subscribe to:
Posts (Atom)